Trochanteric Bursitis Exercises Handouts
The flexibility of our hips is a thing of wonder. They provide us with both power and stability when we are walking. They are able to withstand the impact that we cause when we jump. The human hip joint is notable for being both one of the largest and one of the most robust joints in the body. However, the hip can withstand a lot of force, and when it does, we could experience some discomfort. Bursitis, often known as an inflammation of the bursa, is commonly cited as one of the primary reasons of hip discomfort. These air-filled sacs may be found all over the body and act as cushions between the skin, muscles, and other connective tissues and the bones that make up the skeleton. There are two main bursae on each hip. There is a bursa located on the greater trochanter, often known as the outer point of the hip. This bursa is known as the trochanteric bursa. The other bursa is known as the iliopsoas bursa, and it is located on the interior of the hip area. It is called trochanteric bursitis when the bursa on the exterior of the hip becomes inflamed. Greater trochanteric pain syndrome is another name for this frequent illness, which fortunately responds well to treatment. Some hip and core muscle exercises can help in trochanteric bursitis treatment. Many such exercises can be done readily at home without specific equipment like the ones listed below.
Isometric gluteus medius at the wall
Step 1 – Stand at 90 degrees to the wall, just about six inches away from the wall, with
both legs touching the floor.

Step 2 – Raise the leg closer to the wall to create 90 degrees angle between the thigh and
lower leg. Next, push the bent leg towards the wall. This will fire the gluteus medius
muscle of the opposite leg to ensure posture stability. Hold in the position for 5 seconds.

• Repeat 5 times each time
• 3 sets in a row
• Once-daily
• 5 days a week
Prone Heel Squeeze
Step 1 – Lie on the yoga mat upside down, with your tummy pressed towards the
ground and back upwards, and keep your legs straight.

Step 2 – Bend both of the knees. Next, lift the knee upwards by squeezing your glutes
and, at the same time, press both the heels firmly together, creating V-shape with feet.
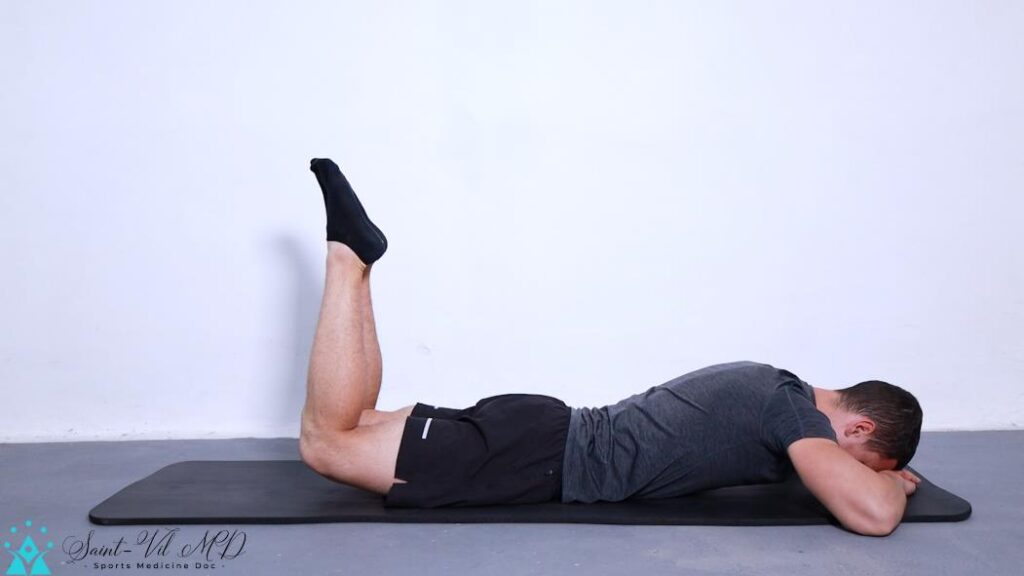
Step 3 – Go back to your original resting state
• 8-10 reps per set
• 2 Sets in a row
• Once-daily
• 5 days a week
Supine bridge with gluteal set and spinal articulation
Step 1 – Begin lying on your back with your arm resting at your sides, your legs bent at the
knees and your feet flat on the ground.

Step 2 – Tighten your abdominals and slowly lift your hips off the floor into a bridge
position, keeping your back straight. Make sure to keep your trunk stiff throughout the
exercise and your arms flat on the floor.

• 8-10 reps per set
• 3 Sets in a row
• Once-daily
• 5 days a week
Sidelying hip adduction
Step 1 – Lie on your side, and place your top leg and foot flat on the floor in front of
you. Next, lift your bottom leg upwards towards the ceiling to feel a pull on your thigh
inside and outside. You can repeat the movement up and down or just hold the position.
This will strengthen your adductor muscle group.

Step 2 – Repeat the similar motion for the other side

• Repeat 10-12 times
• 3 sets in a row
• Once-daily
• 5 days a week
Sidelying hip abduction
Step 1 – Raise your upper leg to just above your hip joint, at the same time, exhaling as
you go. Once you feel your hips and back start to get tense, stop and hold the position
for a couple of seconds.

Step 2 – Gradually lower your leg to its initial position on an inhale. Keep the upper leg
straight and fixed directly above the lower leg.

Step 3 – Flip over to your opposite side and repeat the action with your other leg.
• Repeat 10-12 times
• 3 sets in a row
• Once-daily
• 5 days a week

Wisler Saint-Vil, MD
Sports Medicine Physician
Marietta Memorial Sports Medicine
department medical director
